Follow these for a seamless integration with Pay1st!
Preface
Before starting with the Pay1st implementation, our team will set you up with a provider account in the Pay1st Admin Console, the back-end infrastructure of Pay1st that allows you to track all orders, adjust products and bundles, access customized analytics and more.
Pay1st Admin Console Integration Steps
- Your admins will be granted access to the Pay1st Admin Console to your shared emails after the request is approved by Pay1st.
- You will receive a welcome email. Follow the steps in the email to get access to the Pay1st admin console.
- Pay1st admin will help you to create products and product bundles under the product inside the Pay1st console which is corresponding to game merchandise that the provider will have in their product portfolio.
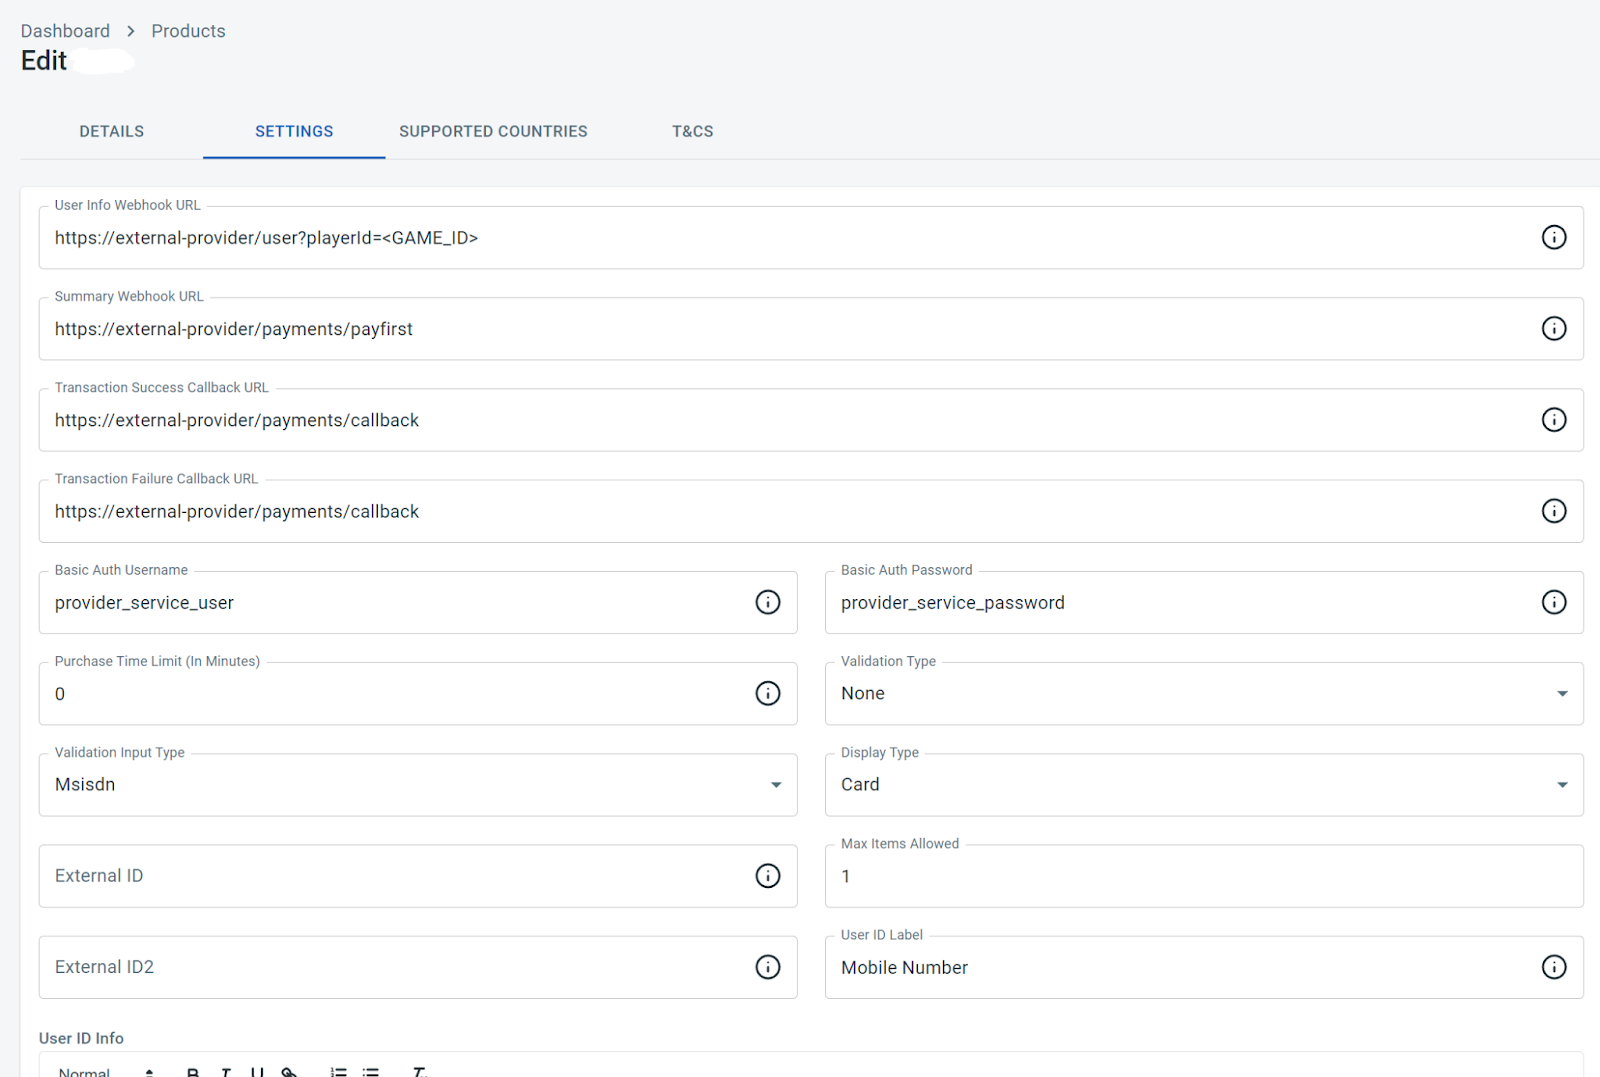
- The product created at the Pay1st admin console has to be updated to populate a few important configurations as below:
- Summary Webhook: Implementation to be provided by the provider and to be consumed by Pay1st. Details about this are mentioned in the next integration steps.
- User Info Webhook: Implementation to be provided by the provider and to be consumed by Pay1st. Details about this are mentioned in the next integration steps.
- Transaction Success Callback URL: For successfully completed transactions, this URL is called if automatic redirect is enabled.
- Transaction Failure Callback URL: When the transaction is failed, this URL is called if automatic redirect is enabled.
- The summary and user info webhooks should be protected by basic authorization and their details should be mentioned in 'Basic Auth Username' and 'Basic Auth Password' fields as shown below. The Pay1st API server will use this credential data to make these webhook calls.
Product configuration in the Pay1st console
- Create product bundle under newly created product.
- In the edit screen of the product bundle, populate the 'External ID' value with the provider's own bundle id or price point.
- Create a new product Fulfilment method
- With the help of Pay1st Admin create product fulfillment methods for each newly added product.
- Associate payment method to product
- With the help of Pay1st Admin associate payment method to the product.
Client-Side Implementation Steps
-
Initialise Payment
- Get Product Bundle Ids from the Pay1st Admin Console. These are for the bundles created for each purchase bundle that is created.
- Set up a success callback URL for the product from the Pay1st Admin Console. This will be called when a payment is successful as mentioned in section here.
- Set up a failure callback URL for the product from Pay1st Admin Console. This will be called when a payment has failed as mentioned in section here.
- When a user selects a bundle, redirect to the platform purchase endpoint with the following params:
Param Format Description username String The user identity. This should be a unique identifier used to identify the user in the game. platform String {AND, IOS, WEB} The mobile platform is used to load the Platform. Use WEB for payments from web applications. productBundleId Long The bundle identifier as configured in Pay1st console productBundleExternalId String The bundle identifier for the Provider countryCode String The ISO 2 country code, e.g. ZA externalReference String (Optional) Your own reference that you would want to use for reconciliation. It will be sent back in the summary webhook. amount Decimal (Optional) The amount to pay. currencyCode String (Optional) The currency code for the amount. partnerSource String The source identifying the partner. language String (Optional) The language to render for localisation. (Supported values: en, ar, fr) URL params:
https://<payments_url>/payment?username=<USERNAME>&platform=<PLATFORM>&productBundleId=<PRODUCT_BUNDLE_CODE>&countryCode=<COUNTRY_CODE>&exernalReference=<EXTERNAL_REFERENCE> -
Different client-Side implementations are as below:
Payments – Server-Side Integration Steps
- User Info Webhook
- The Pay1st backend API server needs to validate the user trying to buy game merchandise on the Pay1st console.
- The provider needs to provide this API implementation so that Pay1st can validate the user.
- Detailed documentation on how to implement user info webhook is available here
- Summary Webhook
- For fulfillment of providers’ game merchandise, Pay1st needs to call the providers’ fulfillment API, so that the game merchandise can be delivered to the user.
- The provider needs to provide this API.
- Detailed documentation on how to implement summary webhook is available here
- Query Payment Status
- The provider needs to make sure that the user has made a successful payment on the Pay1st console.
- The provider can know the status of the payment by calling Pay1st API to query payment status.
- Detailed documentation on how to implement querying payment status API is available here
Payouts – Server-Side Integration Steps
- The detailed payout integration guide is available here